
Metallic 3D brand logo
Turn any brand logo or symbol into a realistic monochrome metallic 3D studio product render with configurable brand, background, and object color.
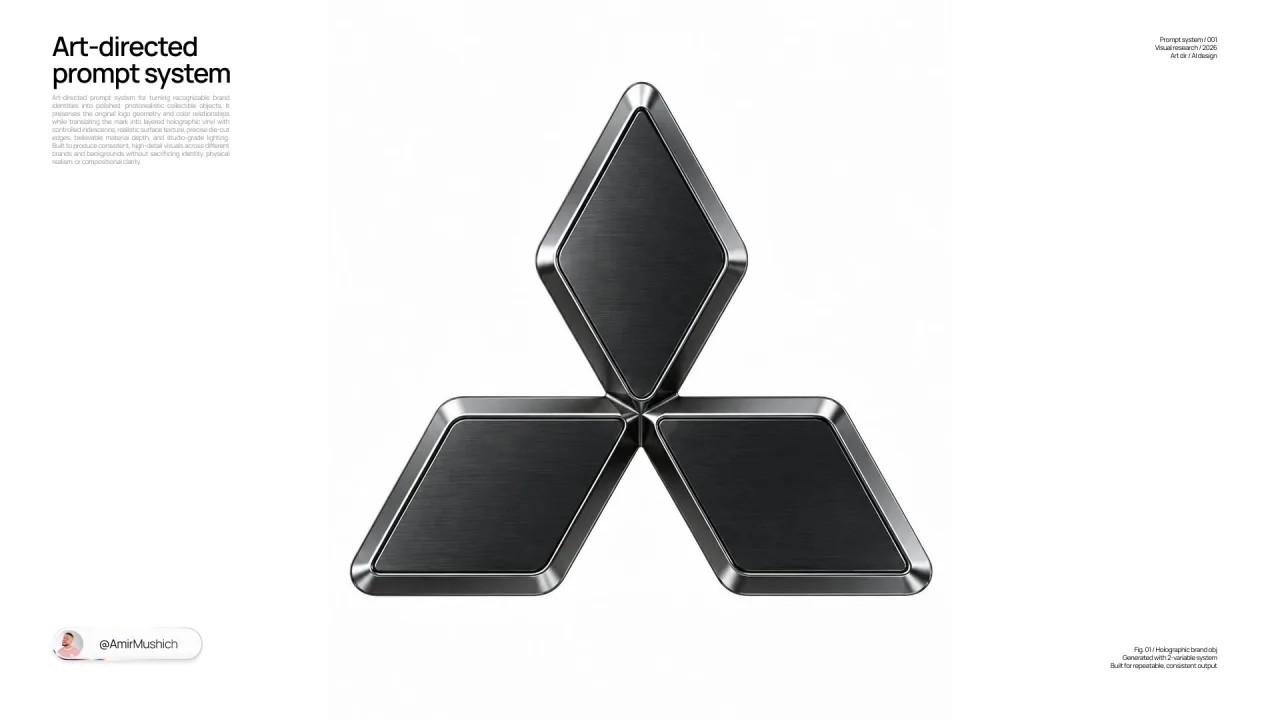
Ready to use
Prompt
Prompt:
(my free & pro AI/design workflows: https://t.co/zBWuQQgKov)

***

[BRAND NAME = _______]
[BACKGROUND COLOR = _______]
[OBJECT COLOR = ________]

Create a premium (AR 1:1) studio product render of the official logo or primary symbol of [BRAND NAME], transformed into a single precision-manufactured sculptural metal glyph.

LOGO ACCURACY

Use the authentic, immediately recognizable geometry and canonical proportions of the official [BRAND NAME] mark.

Do not redesign, reinterpret, simplify or invent a new logo.

Preserve the exact front-facing silhouette, internal negative spaces, spacing relationships and characteristic proportions of the original mark.

If the brand has an official standalone symbol, use the symbol only. If no standalone symbol exists, use its official wordmark.

Ignore the brand’s native colors and render the entire object using [OBJECT COLOR] as the single dominant material color family.

Do not add the brand name, captions or secondary typography unless typography is an inseparable part of the official primary logo.

FORM AND CONSTRUCTION

Convert the logo into a physically believable, precision-manufactured object rather than a basic flat extrusion.

The object should feel like a continuous architectural glyph, CNC-milled component or cast industrial emblem:

— broad, clean primary surfaces;
— substantial physical thickness;
— softly rounded outer corners;
— accurate internal cutouts;
— smooth structural transitions;
— controlled variation in depth;
— physically believable edge construction;
— no unsupported floating parts.

The object must remain elegant and minimal.

Do not add screws, visible mounting hardware, decorative seams, random panels or mechanical details that are not required by the original logo geometry.

EDGE ARCHITECTURE

Build a clearly visible metallic perimeter around the primary faces of the glyph.

The outer bevel must be moderately wide and visually substantial, closely matching the proportion and presence of the reference image.

It should be wider than a conventional narrow chamfer, but must not become oversized, inflated or decorative.

The bevel should:

— remain clearly readable at normal viewing size;
— follow the logo geometry with precision;
— transition smoothly around corners;
— catch long, controlled studio reflections;
— create a strong but restrained metallic contour;
— preserve the canonical silhouette of the logo.

Avoid razor-thin highlight lines, excessively sharp edges or oversized chrome borders.

INSET MATTE PANELS

Treat the broad front-facing areas of the logo as precision-fitted matte material inserts embedded inside the surrounding metallic structure.

Each primary matte face should feel slightly inset into the outer metal frame, as though it has been manufactured separately and carefully inserted, bonded or press-fitted into the sculptural body.

The inset panel must include:

— a very shallow recessed position;
— a soft, subtle bevel around its perimeter;
— an extremely fine separation gap between the matte insert and the surrounding metal frame;
— a microscopic slit-like shadow line inside this gap;
— delicate ambient occlusion where the two materials meet;
— clean and consistent spacing around the entire perimeter.

The separation gap must be extremely subtle: visible enough to distinguish the materials and communicate precision engineering, but never wide enough to resemble a decorative outline, deep groove or assembled plastic panel.

The matte insert, its micro-bevel, the narrow separation seam and the wider metallic outer bevel should create a refined hierarchy of edges.

Do not flatten the matte face and metallic frame into one continuous surface.

Do not add multiple unnecessary borders, concentric outlines or excessive panel layering.

MATERIAL AND OBJECT COLOR

Use [OBJECT COLOR] as the dominant color of the complete sculptural object.

Interpret [OBJECT COLOR] as a premium metallic finish such as anodized aluminium, PVD-coated metal, blackened titanium, coated steel or another physically believable high-end industrial material.

The broad inset faces should use a darker, softer and more matte variation of [OBJECT COLOR], with:

— refined satin roughness;
— extremely subtle directional brushing;
— fine micro-texture;
— restrained tonal variation;
— dense, tactile material depth.

The surrounding structural frame and wider outer bevel should use the same [OBJECT COLOR] family but with a smoother, more polished and more reflective finish.

The object should remain monochromatic. Create contrast through roughness, reflection, depth and lighting rather than through unrelated colors.

Selected bevels may catch pale metallic or near-white reflections from the studio lights, but the underlying material must remain visibly connected to [OBJECT COLOR].

The material must feel cold, dense, heavy and precisely manufactured.

Avoid mirror chrome across the entire object, liquid metal, glossy plastic, rubber, carbon fiber, glass, translucent material, glitter or cheap metallic paint.

LIGHTING

Use controlled high-end studio lighting against a perfectly uniform [BACKGROUND COLOR] background.

Place one large cool-white rectangular softbox above and slightly to the left of the object.

This source should create broad, smooth gradients across the upper surfaces and clearly reveal the width of the polished outer bevel.

Add a narrower strip light from the upper-right and slightly behind the object, creating a clean rim reflection along selected edges.

Use very weak frontal fill.

Keep recessed areas, microscopic material gaps, internal cavities and undersides deep enough to preserve dimensionality.

Use delicate ambient occlusion:

— inside internal cutouts;
— around overlapping or converging sections;
— inside the microscopic separation gap;
— beneath the softly beveled edges of the matte inserts.

The lighting must reveal the construction hierarchy:

outer polished frame,
wide bevel,
microscopic separation seam,
softly beveled matte insert,
deep structural body.

Do not illuminate the object evenly.

REFLECTIONS

Show only controlled abstract reflections produced by large professional studio softboxes and strip lights.

Reflections should appear as long, smooth, carefully placed bands that follow the object’s geometry.

Use the reflections to describe:

— the width of the outer bevel;
— the physical thickness of the glyph;
— the transition between polished frame and matte insert;
— the curvature of softly rounded corners.

Do not reflect a room, photographer, camera, windows, horizon, scenery or identifiable environment.

Avoid colorful environmental reflections, random hotspots, excessive specular noise and uncontrolled mirror-like glare.

CAMERA AND COMPOSITION

Photograph the object almost frontally using the visual character of a premium 90–110 mm product photography lens.

Use very low perspective distortion.

Introduce only a subtle three-quarter rotation and a slightly elevated camera position, allowing the physical depth, upper surfaces and wider bevels to remain visible without distorting the official logo silhouette.

Keep the logo centered horizontally and positioned near the vertical middle of the frame.

The object should occupy approximately 70–75% of the image width while remaining fully visible.

Surround it with generous, calm negative space.

The object should appear suspended in the studio environment without a visible support system.

DEPTH OF FIELD AND RENDER QUALITY

Keep nearly the entire glyph sharply focused.

Use only minimal natural depth falloff on the most distant edges.

No obvious bokeh, exaggerated macro blur or artificial focus effects.

Render with:

— physically accurate PBR materials;
— path-traced global illumination;
— realistic micro-roughness;
— precise ambient occlusion;
— clean anti-aliasing;
— high-resolution surface detail;
— smooth tonal transitions;
— accurate reflections;
— refined edge highlights.

The final result should feel like an actual luxury industrial object photographed in a professional studio: restrained, tactile, architectural, cinematic, precisely engineered and art-directed down to the microscopic material transitions.

Do not add extra text, captions, labels, particles, smoke, pedestal, floor, visible support, cast shadow, glow, neon light, lens flare, scenery or surrounding objects.
Continue browsing
Related prompts

Luxury glasshouse editorial portrait
Create a high-end photorealistic fashion editorial portrait of a woman inside a contemporary glasshouse botanical studio, wearing an ivory tailored suit beside a sculptural chair, surrounded by tropical leaves, glass panels, and dramatic sunlight.
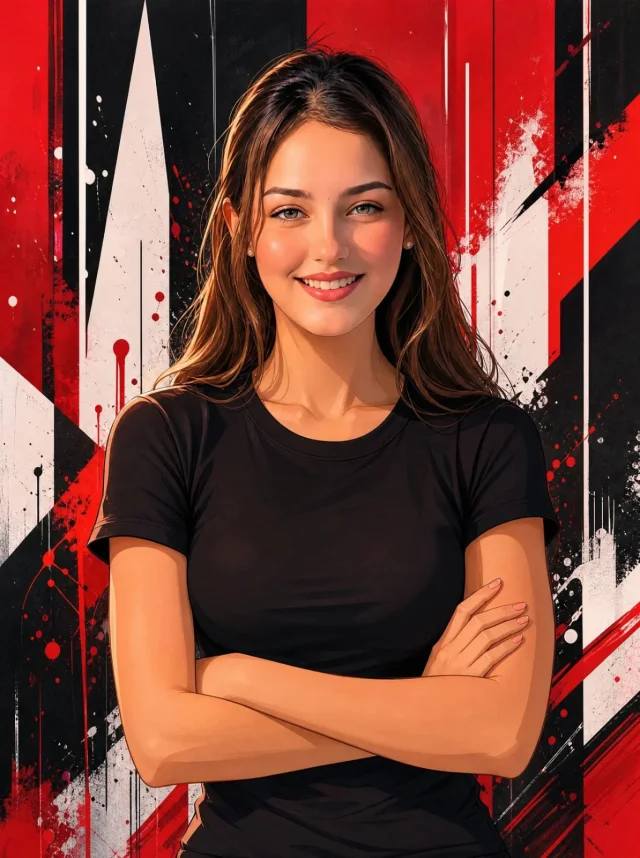
Anime graffiti face-reference portrait
Using a face reference, create a premium anime-style 9:16 portrait of a person in a fitted black t-shirt with crossed arms against a red, black, and white abstract graffiti background.

Korean editorial dark studio portrait
A master prompt for an ultra-realistic high-fashion editorial portrait of a Korean subject in a luxurious dark cinematic studio with dramatic lighting, minimal serif typography, and negative space.